Showing posts with label jelly. Show all posts

Friday, July 27, 2012

Peachapalooza, Part II: liqueur and a lemony jelly and syrup from peelings

Save your peach peelings and lemon rinds
to make jelly and syrup, but discard the pits.
I recently processed nearly 30 pounds of perfect peaches into a delicious assortment of jams and jellies. What didn't get put into jars would up in gallon containers with a vodka to make liqueur. It took a few weeks to fully infuse - and repeated strainings - to yield a blushing but clear pour that (shhh!) lucky friends and family will enjoy as holiday gifts.

Additionally, inspired by Gilt Taste's popular Eat Shoots & Leaves series - especially this IACP award-winning apple peel edition by Sheri Castle - I decided to save all the peach peelings and most of the lemon rinds to make stock for jelly and syrup. The results are as righteous as they are delicious.

Peach Liqueur
1 750 ml bottle of vodka
5 lbs. peaches
2 cinnamon sticks
10 strips lemon zest
2 sealable gallon-size containers
2 cups sugar
2 cups water

Select a brand of vodka you would drink in public, but not an expensive top label. Pour four cups vodka into each of the gallon containers; add a cinnamon stick and 5 slices of lemon zest to each.

Blanch peaches, peel and cut into chunks; reserve peels but discard pits, which contain a trace amount of cyanide. Divide fruit equally among containers. Secure lids and set aside in a cool, not sunny location. Turn container over every day for a full week.

Strain mix first through mesh colander  to gather majority of the juice, then run the juice through a jelly bag; transfer to clean sealable gallon container. Transfer peaches from colander to jelly bag and all to drip for at least an hour. Press lightly to get the last drips, but avoid the urge to squeeze as liqueur can turn cloudy. Pour liquid into a gallon container. (Note, The fruit likely will have given its best to the infusion, but sample a bite before you decide whether to discard or use for another purpose, such as mashing and adding to homemade barbecue sauce.)

Meanwhile, in a small pan over medium heat, dissolve sugar in water and bring to a boil. Reduce heat and simmer two minutes, stirring to ensure that sugar is fully incorporated. Remove from heat to cool.

Add cooled syrup to peach mixture in the container. Seal and set aside in a cool, not sunny location, swirling occasionally, for 4-6 weeks (or more, if you lose track). If necessary, strain one more time before serving to remove any remaining sediment. Transfer to smaller bottles to enjoy or give as gifts.


Lemony Peach Jelly and Syrup
Peach peelings from about 20 pounds of peaches
Rinds reserved from about 8 juiced lemons
Reserved blanching water
About 10 cups water
6-8 cups sugar, divided
2 packages low-sugar pectin (such as Sure-Jel)

Makes two batches of jelly, each yielding 5 half-pints, with remaining stock boosted into a light syrup to flavor soda water.

Jelly
Place reserved peelings, reserved blanching water and fresh water in a stock pot. Bring to a boil over meidum-high heat, then reduce to a simmer. Bubble for about an hour, or until stock is richly colored and fragrant.

Carefully transfer hot mixture to a jelly strainer set over a large pot. Allow to drip undisturbed four about an hour. Gently press obvious juice from the bag, being careful to not release sediment that will cloud the jelly. Discard remains from jelly bag.

You'll need 3 cups of peach stock, 3 cups of sugar and 1 package of low-sugar pectin per batch of jelly. Pour stock into a wide, heavy-bottom pot of dutch oven over medium-high heat. Add pectin and 1/4 cup sugar, stir constantly until fully blended. Bring mixture to a full rolling boil, then add remaining sugar. Stir often until mixture returns to a full rolling boil. Watch the clock or count off 60 seconds, then remove the pot from heat.

Peach syrup in soda water (pre-stir)
Following USDA directions, process in water bath 10 minutes then carefully transfer to heatproof surface. leave undisturbed until jars are fully cooled and set. Repeat for second batch; do not double this or any jelly recipe. Ratios are important in canning and a double batch of jelly may never set.

Syrup
Measure remaining peach stock an 1 cup sugar for every 2 cups stock, or more if you prefer a sweeter syrup. Transfer mix to a medium pot and bring to a boil over medium-high heat, stirring to ensure that sugar is well incorporated. Remove from heat and, when cool, transfer to a sealable bottle and refrigerate.

Fill a tall glass with ice. Pour in about 3 tablespoons syrup then top with soda water and stir. Garnish with a peach slice, if you have any left, or spike with a splash of vodka.

Note: If you want a thicker, pancake-style syrup, boil the mixture to reduce to desired consistency. Remove from heat and, when cool, transfer to a sealable bottle and refrigerate.


Thursday, May 10, 2012

Crook’s-inspired Honeysuckle Jelly – two ways


This blog was first published by Chapel Hill Magazine.

Honeysuckle sorbet is one of the many signature dishes that makes Crook’s Corner a Chapel Hill landmark. Developed by Chef Bill Smith from a Renaissance-era recipe for jasmine ice, the delicate flavor of this decadent slush inspires near riots in the West Franklin Street eatery every spring.

Smith’s fuss-free recipe is easy to recreate at home, and it converts nicely into a simple but intoxicatingly fragrant jelly. Indeed, the ingredients are nearly identical, with the exception of added low-sugar pectin and canning jars instead of an ice-cream machine.

The Crook’s-inspired Honeysuckle Jelly below is easily tweaked to create a jewel-toned strawberry variation – which no doubt would be insanely good made instead with sun-warmed wild blackberries, which just happen to grow amid Smith’s preferred honeysuckle patch. Either way, the recipes are so simple and reliable that they were used to teach a first-time canner how to make jelly.  

Smith prefers to pick honeysuckles in the evening, when their perfume is heavy, but concedes he’s had delicious results with flowers plucked dewy-fresh is the morning, too. An ideal time is after a rain, when older blooms have shaken loose, leaving the best pickings behind.

The honeysuckles used to make these jellies were gathered along the greenway of our North Raleigh neighborhood, but they can be found in plentiful supply along roadsides and other places where weeds thrive. Be careful to choose bushes that have not been chemically treated, and ask permission as appropriate.

You’ll likely observe a lot of variation – some flowers are pure white to the stem while others reveal a tender blush of pink, and the petals will range from white to buttery yellow. Avoid ones that are dark yellow or shriveled as they may be bitter, and for goodness sake, don’t bother pinching off the tiny green bases.

“Some people think I actually do that at the restaurant, or use just the stamens because that’s their childhood experience with honeysuckles,” Smith says with a chuckle. “If I did that, I’d never get around to making anything.”


Honeysuckle Jelly
4 cups (tightly packed buy not smashed) honeysuckle flowers, leaves and stems discarded
5 cups cool water
1 package low-sugar pectin (such as Sure-Jell in the pink box)
3 cups sugar
½ tsp. unsalted butter
1 tsp. freshly squeezed lemon juice
Speck of cinnamon

Prepare a dozen 4-ounce jelly jars (or comparable assortment) according to USDA guidelines.

Place the flowers in a nonreactive container (glass or stainless steel) and cover with cool water. Weight down with a plate. Sit on counter overnight or at least 8 hours. Drain mixture through a jelly bag or cheesecloth-lined colander. Measure 4½ cups honeysuckle stock; discard blooms.

In a deep, heavy-bottom pot – I use a pasta pot – pour in stock and add package of pectin and ¼ cup sugar. Over medium-high heat, stir until sugar and pectin are fully incorporated. Stirring often, add butter and bring mixture to a rolling boil that cannot be stirred down.

When at a full bubble, add the rest of the sugar all at once, plus the lemon juice and cinnamon. Stir frequently until mix returns to a rolling boil that cannot be stirred down. Use a timer or count off 60 seconds. Transfer pot to heatproof surface.

If necessary, skim any foam with a tight mesh strainer. Carefully pour hot jelly into prepared jars, top with warmed lids and finger-tighten screw-on bands. Place jars in water bath and boil for about 10 minutes. Turn off heat and let the jars settle for about 5 minutes, then carefully remove and set on a heatproof surface where they can remain undisturbed until cooled and set.

Don’t worry if the jelly does not set quickly. It should firm up nicely by the next day, but if it doesn’t, fear not. You can now boast of having made amazing honeysuckle syrup, great in cocktails or drizzled on desserts. If you’re daring, you can even dab a drop behind your ears.

2 cups fresh strawberries, coarsely chopped
5 cups water

Add strawberries to water in a medium sauce pan and bring to a boil. Lower the heat and simmer, covered, for 20 minutes. Remove from heat and cool to room temperature. Drain through jelly bag or cheesecloth-lined colander and discard remaining strawberry mush.

From this point on, continue as described in the original Honeysuckle Jelly Recipe, substituting 5 cups of strawberry water for plain water.


Tuesday, May 1, 2012

Lemony Rosemary Garlic Jelly

Rosemary jelly and chevre on crackers
Thanks to my husband's hard work, our yard has considerable curb appeal. Checking out joggers, strollers and dog walkers who pause to enthusiastically point out their preferred blooms is our favorite spring sport. Frankly, it's better than cable.

Curbside, there is little doubt that the annual showstopper is our rosemary. It grows thick around our mailbox at the sidewalk, where its tiny purple blossoms never fail to charm passersby. Our mail carrier once briefly abandoned her appointed rounds to ask if she could snap off a few sturdy springs for shrimp kebabs. An unfamiliar neighbor rang our bell, in the rain, to confess her admiration and beg for a clipping. I handed her the snips we keep by the door for that precise purpose.

I've made several herbal preserves from our garden, notably a pale green basil jelly that's delicious on simple grilled sandwiches - such as slices of hearty bread, fresh mozzarella, thick slabs of summer tomato and a crunchy sprinkle of sea salt.

This weekend, Tim gave the rosemary a serious haircut so I had plenty of fresh cuttings to make jelly - and share a fragrant bagful at the office. There are a few steps involved, mostly hands-off waiting, but it's worth it. Save any excess for yourself, or crack open a jar right away. It's terrific on crackers with a smear of tangy chevre.

Rosemary Infusion
4 generous cups fresh-cut rosemary sprigs
1 bottle reisling (or other sweet white wine)
2 cups water

Bring to a boil then reduce heat and simmer, covered, for 20 minutes. Remove from heat and steep at least 1 hour.

Transfer cooled infusion to a jelly bag and let drip into a large measuring cup. It should yield about 4 to 4 1/2 cups rosemary stock. (If short, add just enough water to measure 4 1/2 cups.)


Garlic Crunchies
2 large cloves garlic, minced
1 large spring onion, white and pale green only, chopped
1 tbsp. fresh rosemary, coarsely chopped
1 tbsp. unsalted butter
1 tsp. Maldon sea salt
1 tbsp. lemon zest

In a small sautee pan, melt butter and add onion, stirring to coat. Add garlic and rosemary. Bubble on low heat until onion and garlic are lightly toasted and the butter has reduced by half. Remove from heat and stir in sea salt and lemon zest. Transfer to small bowl to cool.

Lemony Rosemary Garlic Jelly
4 1/2 cups rosemary stock
2 tbsp. white balsamic vinegar
1 pkg. low-sugar pectin (such as SureJel, pink box)
3 cups sugar
Garlic crunchies
1 dozen 4 oz. canning jars and lids (or comparable assortment)


Prepare jelly jars and lids according to USDA guidelines.

Bring rosemary stock, 1/4 cup sugar and package of pectin to boil in a deep, heavy-bottom pot. Stir well to ensure the pectin-sugar mix is absorbed.

Stir occasionally until mixture reaches a rolling boil that cannot be stirred down. Add sugar all at once, stirring well, then add garlic crunchies. Stir often until mix returns to a rolling boil. Use a timer or count to 60 seconds, then remove from heat.

Skim foam, if necessary, and pour hot jelly into sterilized jars. Press warmed lids onto clean jar rims and and lightly screw on the bands. Carefully place in hot water bath and turn heat to high. Boil  for 10 minute, then turn off heat and leave jars in water bath about 5 minutes to settle. Remove to heatproof surface to fully cool.

Jars should ping and lids should slightly depress to indicate complete seal. If you're not certain a jar has sealed, keep it in the fridge and enjoy as private stock. Store others in a cool cupboard until ready to use or share with friends.


Sunday, April 15, 2012

The first bloom of spring canning

To make room for the abundance to come, I have been faithfully working down the contents of my canning closet and sharing jars of last season's excess with friends and neighbors. I have been scouring recipes books and searching online for something new and different for my first batch. Of course I'd use strawberries - but what else?

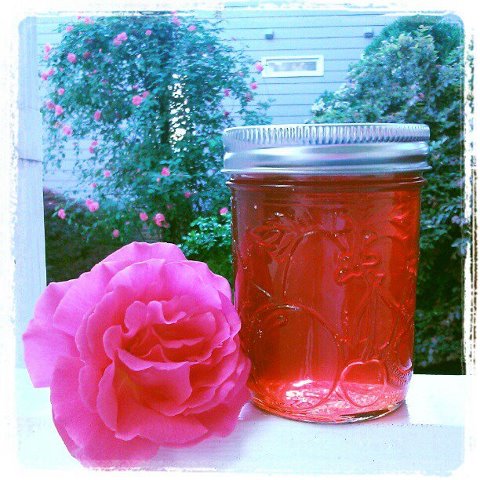
I considered the heat of chiles, the sweet bite of balsamic vinegar, shreds of bright green spring basil. Then, with an appeal as enticing as its heady aroma, it hit me: rose petals.

We have a lovely rose bush that was planted years ago at the end of our driveway to mask an abandoned basketball pole, which itself is planted in an absurd amount of concrete. Tim decided to wrap the pole in black mesh and set about training the vines to climb. It resisted at first but is now a bona fide showstopper.

Its heavily perfumed blooms never last inside - the petals usually shrug off in a day -- but this made them ideal for a rose water infusion, which in turn he made a fine base for strawberry juice. It was a two-day process that likely could be condensed, but it was time well spent.


You'll need a jelly bag, an inexpensive and wise investment if you plan to make jelly or syrup more than once. If you don't have one - or have done such a good job of putting it away that you can't find it - you can jerry-rig one from a cheesecloth-lined chinois or colander suspended over a large measuring cup or mixing bowl. I prefer a measuring cup as it's encouraging to watch it fill.

Only use roses from a trusted source where you are certain they have not been treated with insecticide. Choose large, open blooms that pull loose with little effort. Be sure to inspect well for blemishes and travellers. My bowlful had two crawling visitors that I returned to the wilds of my side porch.

This recipe will produce enough juice for two batches of jelly, which eventually follows the basic directions found on the yellow box of Sure-Jel pectin. Combining to save time could result in a doubt batch of disappointment that will never set properly.

Strawberry Rose Petal Infusion
12-15 rose blossoms
6 cups water
3 tbsp. fresh lemon juice, divided
4 1/2 cup whole strawberries

Lightly pull petals from rose heads and place in water-filled pot. Bring to a boil then reduce heat and simmer, lightly covered, for about 20 minutes. The result should be fragrant, rose-tinted water with color-drained petals that look like wet tissue paper. Move pot off heat, cover and steep 30 minutes.

While mix is steeping, clean and trim strawberries. I used a food processor to coarsely chop the berries. Add remaining lemon juice and pulse until still chunky but juicy. It should measure about 3 cups.

Add mashed strawberries to rose water and return mix to a boil. Reduce heat and simmer, lightly covered, about 10 minutes. Let mix cool completely then cover and store overnight in the refrigerator.

Day 2
1 large lemon, juiced
1/2 cup white wine
2 yellow boxes Sure-Jel pectin
9 cups sugar, divided
1 tsp. butter
12 8-ounce jelly jars, or equivalent mix of sizes

Remove strawberry-rose mix from refrigerator and leave on counter until contents are at room temperature. Carefully transfer to jelly bag or cheesecloth-lined colander over a large measuring cup or bowl to catch juice. Resist the urge to squeeze the bag or press the contents to speed the process as it will release residue that will cloud the jelly.

Allow at least an hour to drip - or, better still, leave it on the table and go out to breakfast with a friend. By the time you return you should have about 6 1/2 cups juice. Don't worry if you have a little more or less.

Add the fresh-squeezed juice of 1 lemon, 1/2 cup white wine and enough water to measure 7 1/2 cups total. You will need 3 3/4 cups juice for each of two batches.

From this point on, you pretty much follow the Sure-Jel method detailed on the package insert. First, be sure you have sterilized jars in a large canning pot or stock pot, and place a set of fresh lids in a covered bowl of very hot water to soften. When jars are clean, set them upside down on a clean kitchen towel. Keep your canning pot at a simmer to be ready when you need it.

Pour 3 3/4 cups strawberry-rose petal juice into large, heavy-bottom pot with high sides; I use my pasta pot but others prefer a wider pot with more surface exposure. Using a long wooden spoon or silicon spatula, stir in packet of pectin while bringing to a boil over medium heat. Add 1/2 tsp. butter to reduce foam.

Surface foam is easily removed to reveal clear jelly.
When it comes to a rolling boil, add sugar all at once, stirring well to combine. The mix will take on a glassy sheen at this point, a beautiful sight that is one of the rewards of making your own jelly. Stir frequently until it comes to a roiling boil that cannot be stirred down, then let it rip 1 minute. Seriously, watch the clock or count.

Remove pot to a heat-proof surface and skim any scummy foam with a metal spoon or mesh strainer. I prefer the latter as it allows useful juice to drip back in. Using a canning funnel to minimize spills, quickly but carefully pour into canning jars, leaving about 1/2-inch head space. Wipe rims with a damp cloth to ensure they are clean, then lightly press a warmed lid on each jar. Add screw bands, tightening only until you hit resistance.

Carefully place jars in canning pot, ensuring that the water level is at least an inch above the jar tops. Bring to a full boil for about 10-12 minutes. I usually turn off the heat and leave jars in place for about 5 minutes to settle before removing to heat-proof surface, but if you can't resist, go ahead and pluck them out. Within moments, you'll start hearing pings as the jars complete their seals. If possible, don't move jars until they have cooled.

If a jar does not ping, or its lid does not appear slightly depressed - hallmark signs of successful canning - just put it in the fridge and enjoy it now. The rest can be saved and safely savored for up to one year. I feel obliged to say that for new canners, but no kidding, this stuff is too good to sit around that long.